Holly In Your Hair - a DIY

holly1

Does that title sound like I’m about to show you a bunch of photoshopped pictures of miniature versions of myself hanging out in other people’s hair? Because now that’s all I can picture. 

Anywho… I wasn’t born around Christmas, but I’m a sucker for playing up the whole holly thing this time of year. I often use the phrases “holly jolly Christmas” and “happy Holly-days”, and I gravitate towards any decorations that include the leaves and berries. So when I saw all of the christmas stuff at the floral section in Michaels (and at 70% off!), I got an idea. This Christmas, I’ma be Holly… wearing holly. 

Genius, I know. 

Here’s how I did it….

holly2

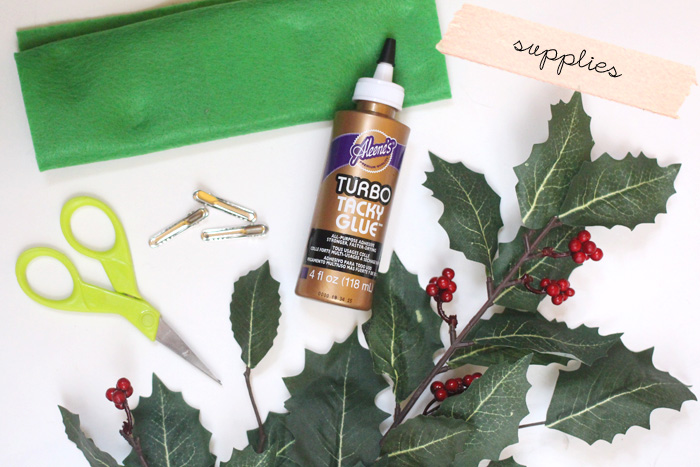
You’ll need: fake holly leaves (you can get it for a few dollars at a craft store) - adhesive - felt - alligator hair clips

holly3

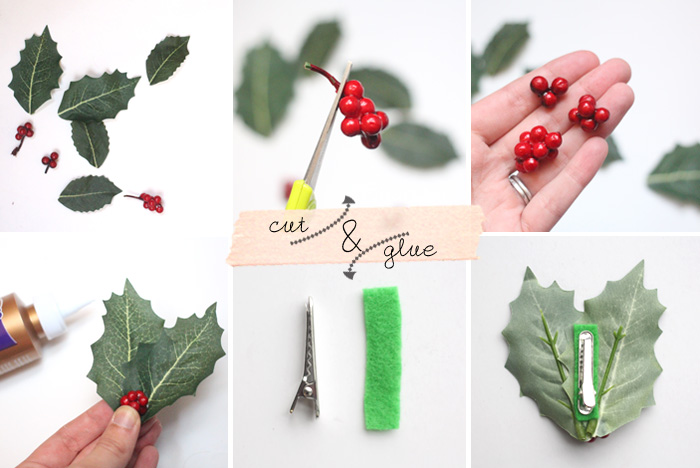
1. Most likely, the leaves and berrys will just pop off of the main stem with a light tug. But if not, just simply cut them off. Cut the little stems off of the berries, too. 

2. Glue a couple of leaves together to your desired look. Once they are completely dry, glue the berries to the leaves where the come together near the bottom. Note - I started out with tacky glue, which worked  really well glueing leaf to leaf. But not so much for the berries. I ended up using super glue for those. 

3. Cut a small piece of felt that is just slightly bigger than your hair clip. 

4. First glue the piece of felt to the back of your holly leaves - right in the middle, but closer to the bottom. Once dry, glue your hair clip to the piece of felt. Adding the felt gives it a little bit more stability. 

5. Voila! Stick one in your hair, or wear a bunch together. Happy Holidays!

holly4
holly5
holly6

DIY Hand Warmers

handwarmer1

I don’t know about you guys, but I’m a baby in the cold. Even having lived somewhere that has a cold, snowy winter my entire life, I still can’t handle it. And I’m actually dreeeeeading another Northeast winter. 

So I made up a few batches of these little teeny hand warmers to try and combat the chill. I keep them right next to my keys, so I remember to heat them up quick before I leave. That way I don’t have numb fingers on my walk to Starbucks the grocery store. Oh who am I kidding,  I’m going to Starbucks. 

Here’s how I did it…..

handwarmer2

1. For a set of hand warmers, cut 4 3x3” pieces of cotton fabric.

2. Place two of your squares wrong sides together, and sew 1/4” from the edge. Pivot at the corners, and leave about 1/2- 3/4” opening. Don’t forget to backstitch at the beginning and end. 

3. Fill your square pouch with rice about 3/4” of the way full. I used a funnel so that I didn’t make a mess :)

4. Sew and close up your small opening.

5. Trim along the edges with pinking shears so that they don’t unravel. That’s it!

………

But if you would prefer a cleaner look…..

handwarmer3

Start by placing your two square pieces right sides together, and sew just like before (1/4” from the edge, leave 1/2” opening). Clip your corners and trim the seam allowance, and then turn right side out through the opening.  Fill with your rice, and then close your opening with an invisible slipstitch.

Just slightly more work, but it does have a simpler, cleaner look!

handwarmer4

Right before you walk out of the house, just heat them up in the microwave for about 30 seconds and slip them in your coat pocket. Caution! They’ll be really hot! I But I like to get them just a tad too hot so that they stay warm longer.

Stay toasty, my friends :)

handwarmer5

DIY Necklace Stands

necklacestand1

I’ve been looking for some new displays for some shopHollyDolly items. And when I couldn’t find anything I really liked, I decided to make them myself! They are good display stands for jewelry designers, but would also be super cute for displaying your necklaces at home! Check out the supplies below, and see how to I put these together after the jump….

Supplies:

- plywood ( I just used craft plywood)

- thin wood stick for kickstands

- craft saw

- sandpaper

-paint or wood stain

-wood glue

necklacestand2

1. Lightly draw out your desired shape onto your wood. I went with a basic design so it would be easier to cut out. But I think some rounded edges, or cute design details would be adorable!

2. Use a craft saw (or an actual saw if you are hardcore) to cut out your shape. It may be a little rough at first, but that is what the sandpaper is for. Use the sandpaper to smooth out and clean up your edges. 

3. Use paint or wood stain to add your design. I though about stripes, chevron, and little flowers, but eventually landed on a simple polka dot. 

necklacestand3

4. Take your wooden stick, and rub one end against the sandpaper at an angle, until you have a bit of a slant. Cut the other end to your desired kickstand length.

5. glue your slanted edge to the back of your stand. Let dry completely before you attempt to stand your stand up. 

That’s it! Display your necklaces, and admire your handiwork. 

DIY Burlap Envelope

envelope6

A part of re-inventing shopHollyDolly has been coming up with a new way to package and wrap up orders. It just so happens that I have a lot of extra burlap lying around post-wedding. So decided to make some super simple burlap envelopes, with some tissue paper in between so the burlap doesn’t scratch the leather rand other items. 

They are soooo easy, and I’ve been making them in all different sizes for all different items. They would be cute to package up any little gifts!

envelope1

1. Make a template for your envelope. It all depends on the size you want. 

2. Use your template to cut out one piece of burlap, and one piece of tissue paper. You may need to iron your burlap and tissue paper before you get started. For the tissue paper, make sure you use a low setting and do it quickly. 

envelope2

3. Place the tissue paper on top of the burlap and sew along the bottom edge. 

envelope3

4. Fold up into an envelope shape. But not all the way to the very edge - leave about half an inch before the flap starts. Pin in place. Sew from one bottom edge, aaaall the way around (including the flap), until you reach the other bottom edge. 

envelope4
envelope5

5. Put in your goodies, and close however you like! I tied some bakers twine around it and finished it off with some HollyDolly stickers I got from Moo.com. You could also sew on a snap or button, or whatever you can come up with!

DIY Yarn Lanterns

lanterndiy1

Supplies:

-string/yarn

-vaseline

-elmers glue

-corn starch

-water

-balloons

-spray paint (optional)

IMG_6127

1. Set up your work space. Hang a horizontal dowel/rod/stick/wire across two chairs/shelves.etc. Somewhere where you can hang multiple balloons from with string. Lay down plastic or a tarp underneath, and make sure to cover the entire work space. Seriously. Look at the pictures below. This isn’t exactly a neat and tidy project. 

2. Blow up your balloons to your desired size and hang them, using string, from your rod. Make sure they are not touching each other, the wall, etc. 

3. Cover the balloons in vaseline, to make sure the string doesn’t stick to the balloon when the glue dries.

4. Make your glue mixture. Mix about half a bottle of glue, 1/2 cup of cornstarch, 1/4 up water. This is only enough for a few lanterns, so mix more if you are making a lot of them. 

IMG_6149

5. Run your yarn through the glue mixture and start wrapping it around your balloon. This works so much better if you have two people. One person can feed it through the glue, while the second person takes the newly glue covered yarn and wrap. Theres no rhyme or reason to the wrapping - just go with the flow!

IMG_6073

6. When you have your desired look - cut the yarn and tuck in the ends. Let dry at least 24 hours. Personal tip -after it’s fully dry, give it a light test squeeze to see if it is soft in any spots. If it doesn’t feel firm enough to you, give it another coat of glue and let re-dry. 

lanterndiy2

7. When it is fully dry  - hold your breath, and pop the balloons! Pull out the balloon and scrape off and excess glue from the string. 

Holly+Zach_cer-5

8. That’s it! You can paint or spray paint them if you would like. Or try using colored string to start with!

Holly+Zach_reception-28

***last two photos by Lindsay Dedario Photography***

If You're Thinking About Getting A Photo Booth.....

IMG_2301

…..for your wedding or party - DO IT. You will not regret it. 

photos1

Renting our photo booth was probably the best decision I made for our wedding. Seriously. Everyone loved it, and I could have filled six of those frames with the amount of photo strips I have. 

I originally wanted to get custom made, really long frames for all of them. But that turned out to be ridiculously expensive. So, instead, I found these floating frames at the craft store, and used clear scrapbooking squares to arrange and attach all of the photos between the two pieces of glass. 

Let’s just say, I’m pretty much in love with them. 

DIY Passport Cover

I made my passport pretty, and here’s how……

1. Cut out two  12x6.5” rectangles. One in your outer fabric, and one in lining fabric. 

2. With right sides together, sew a 1/2” seam around entire edge, leaving a small opening so you can turn right side out. 

3.  trim corners and seam allowance.  

4. Turn right side out through opening. Press. 

5. Using an invisible slip stitch, hand sew the opening closed.

6. Fold front end inward aprox. 1 1/4” and pin. Fold back end in aprox. 2 3/4” in and pin.

7. Stitch down (you can machine stitch if you want - just stay as close to the edge as possible. I chose to hand sew with slipstitch on the very edge, catching only the lining. It’s practically invisible).

8. Slip in your passport, and voila! You can travel in style now :)

DIY Polka Dot Shorts

1

I’ve seen so many of these DIYs around the web lately. And I’m a polka dot addict, so I couldn’t resist. 

This one is pretty easy, folks. Here’s what you need:

- a pair of old or thrifted shorts

- ruler

- chalk or fabric pencil

- fabric paint

- small dabber or pencil eraser

2

First, mark where your polka dots will go. Starting at the corner, and using your fabric chalk or pencil, make small dots an inch apart. 

3

Then get to dabbing! I used a small foam dabber made for stenciling, but an eraser at the end of a pencil will work just as well. Lightly dab your dabber in your paint, making sure to get rid of an excess, and dab over your marks. That’s it! Depending on the colors you are working with, you may need to go over them again, once they are dry, if they are too sheer. 

4

You can see more of my final product in tomorrows outfit post.

THREE Faux Fur DIYs

I’m on a roll with my one project a week goal. So much so that I did three this week instead of one! I was inspired by one of my favorite DIY  and lifestyle blogs - Cotton and Curls , who just recently did a faux fur week with 6 different projects!

Untitled-2 copy

My first two projects were taken straight from Liz. If you are interested in the instructions, make sure to check out her pom pom  and boxy vest tutorials. As well as the rest of her faux fur projects

Untitled-1

And then I went off on my own for my third item - a faux fur snood!

Heres what you would need:

-faux fur

-measuring tape

-sewing machine

-needle and thread

1

1. Cut out a piece of fur aprox. 36 x 28”

2

2. With right sides together (fur sides together), fold the fur in half the long way, creating a tube. Sew along the edge. 

3

3. Next, turn the tube right side out again, so the fur is on the outside. Being the ends on the tube together, and pin and sew as far around as you can. For me it was a little more than half way. 

4

4. finish closing the ends by hand stitching. Don’t worry if your hand sewing isn’t the greatest - the best part about working with the faux fur is that it hides all of the stitching!

finished

And voila, a new cozy snood :)

………………………………………….

Don’t worry, you will see a lot more of these three items in upcoming outfit posts!