

It's been so long since I've shared a DIY with you guys! I really love this one, and I've done it in the past (although I'm still perfecting it, as you'll see!) I'm going to show you how to paint a marbling effect with shaving cream. I'll show you how to use fabric paint and fabric so you can create all sorts of cute little sewing projects. But note that you don't necessarily need to do this on fabric. If you use regular craft acrylic paint, this could work on a sturdy paper or canvas, or any other surface you want to try. I would think its the same process, though!
Supplies:
- shaving cream
- baking pan/cookie sheet
- white fabric ( try to stick with a natural fiber like cotton)
- fabric paint (if you can't find fabric paint in colors you like, you can mix acrylic paint and a fabric paint medium to make it more flexible for fabric)
- a straight edge, like a ruler
- large plastic or garbage bag underneath everything to contain the mess

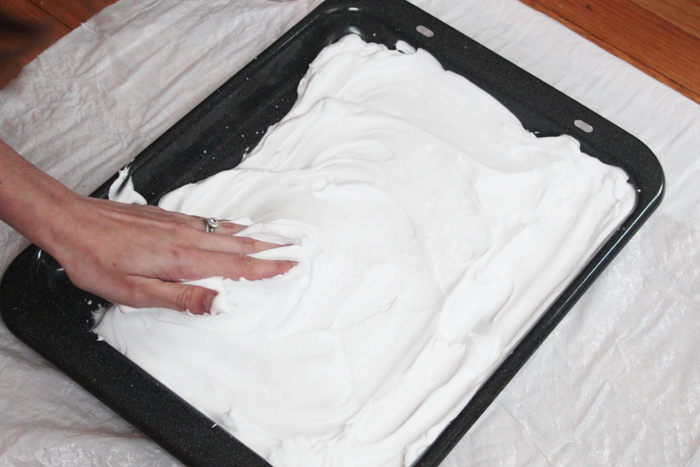
Squirt a bunch of shaving cream onto your cookie sheet and smooth it out. You can use a toll or something to smooth out the cream, but i just use my hand. It's fun to get messy, and it smells so good!

Squirt on you on your fabric paint whichever way you want. Streaks, squiggles, small blobs. Just avoid large blobs of paint. Layer on your colors and have fun with it.
(So I actually did this next step two ways because I wasn't happy with the first go round. But I'm going to show you it anyway and the result, in case you DO like how it looks.)

It's time to swirl . For this first one, I used a skewer stick (a toothpick or something else small would work too) to create small swirls. Swirl lightly just on top of the shaving cream, you don't need to dig into the cream.
After this, I added a few more squirts of red and orange and swirled a little more. I'm going to jump ahead a couple of steps to show you the finial result from doing it this way:

This is what it looked like from using a stick to create small swirls. Not really what I was going for, so I tried a different swirling method you'll see below. But by all means, if you like this look, go for small swirls!


Ok, so I started over with my shaving cream. I squirted on my paint, and then swirled with my fingers and hand. VERY gently, and just on the surface of the shaving cream. If you mix too much, you'll just end up with a muddled mess.

Carefully lay your fabric down on top of the shaving cream. Gently pat and rub the fabric to transfer the paint. Don't push too hard or rub too hard. Or, again, you'll get a muddled mess.

Gently pull back the fabric off of the shaving cream.

Lay the fabric down flat with painted side up. It's going to look messy because there is a lot of excess shaving cream sticking to it.
This step is probably the most difficult part. I've done this painting process a few times in the past, and this is the part that I tend to mess up on and cause me to start over. So just note that you may have to try the whole thing a few times to get it right. Have plenty of supplies on hand to do a few versions.
You need to use your straight edge to veeery gently and softly scrape off the excess shaving cream. I do this in small sections, because the cream will build up on the straight edge. So I do small sections, and wipe it off in between. Be VERY gentle with a soft hand. If you press too hard, you'll smear the paint and end up with straight edge paint lines.
** As you can see, this DIY is all about being very gentle and soft handed. **
You don't have to get every last bit of shaving cream though. You'll be washing it later, so the rest of it will come off. Just try to get the majority of it.
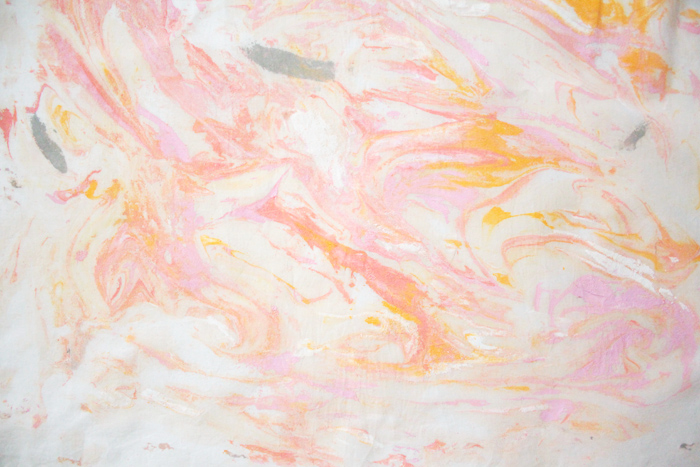

I had a larger piece of fabric, so I repeated everything a second time to cover the rest of it. And this was my result! Not exactly perfect, but I'm pretty happy with the way it came out.
Let the paint completely dry on your fabric. And go ahead and clean everything else up!

Once the paint is completely dry, hand wash it really well.
Ring out, let dry, and press if needed. If you do press it, iron it from the wrong (non painted) side, or use a pressing cloth. Don't press right on top of the paint.

That's it! Now you can do whatever you'd like with your fabric. I turned in the edges and stitched to create a cute little hand towel for Penny's play kitchen. In the past, I cut out pieces for eye masks, and even did it on cotton canvas to create zipper pouches. Sky's the limit! If you have the patience, you could repeat all over a large yardage of fabric to make larger items.
