
1. Butterfly Collar Clips by Ladybird Likes 2. Pencils by Amanda Catherine Designs 3. Light Fixture by Bean Shop
4. Thyme Temporary Tattoo by Julia Rothman 5. Palm Leaf Sunglasses Case by Kertis

Blog
1. Butterfly Collar Clips by Ladybird Likes 2. Pencils by Amanda Catherine Designs 3. Light Fixture by Bean Shop
4. Thyme Temporary Tattoo by Julia Rothman 5. Palm Leaf Sunglasses Case by Kertis

Hey Boston friends! You may have noticed that the H&M 100 Newbury St. location has been going through some major renovations for a while now. And it’s time for their grand re-opening! This Thursday, August 7th, from 10am-noon to be exact. And you’re invited! The new layout will now feature “store within a store” sections, and will be one of four stores in the country to carry their home collection.
To celebrate, they’ve teamed up with The Boston Fashionista for some fun discounts and giveaways!
See you there!

*Valid only on opening day, August 7, 2014. In store at 100 Newbury Street only.
**Sponsored by H&M. All opinions are my own.
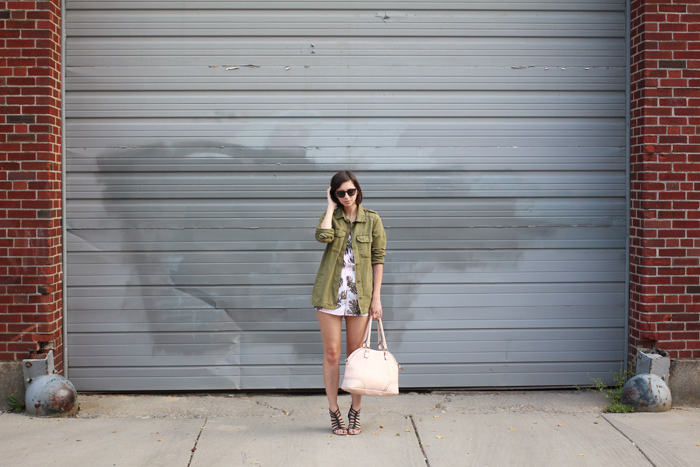
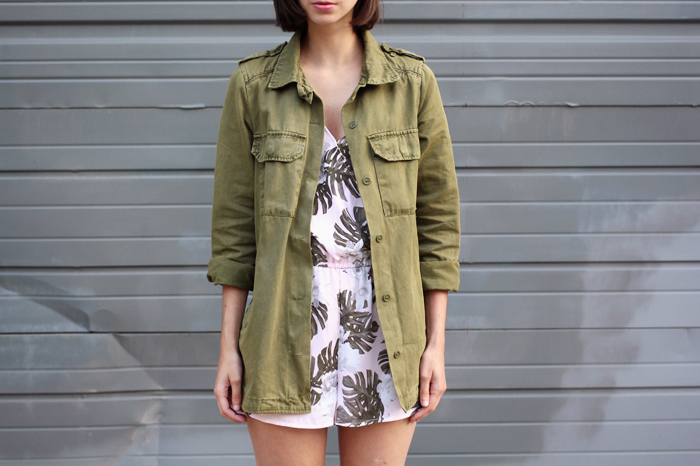
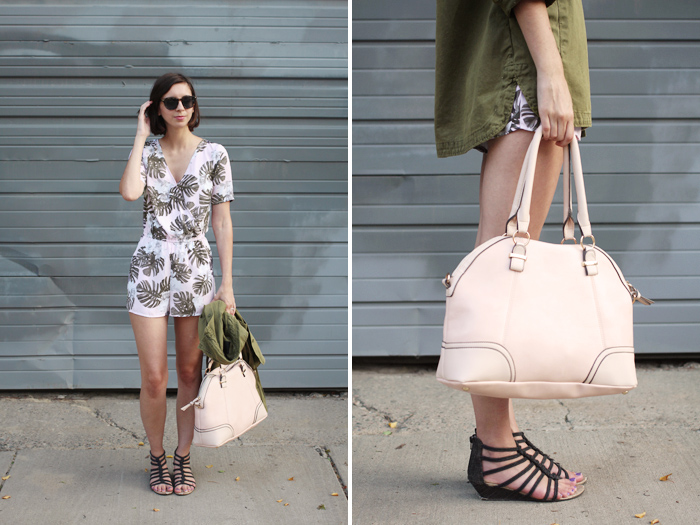
jacket: Forever21
romper: H&M
sunglasses: Warby Parker
bag: Accessorize
sandals: Blowfish

Well, that was a bit of an unexpected mini-hiatus. One post last week? That’s pretty unlike me. But my mind has been elsewhere lately. Personal stuff outside my internet world. Top that off with some more traveling, and blogging took a bit of a backseat.
To be honest? I kind of liked it. It felt good.
But it also feels good to be back into it! I got a whole new line up of outfits ready for this week. And so many fun events coming up. But let’s start with this fun little get-up. If you follow me on Instagram, you may of saw that I wore this to….. the grocery store. Yeah. I wore this to go buy milk and a bag of chips to go with my dip. Sometimes you just need to be a little fancy for no reason.


tee: LOFT
skirt: Urban Outfitters
sunglasses: Warby Parker
sandals: Lulu’s

I love little brooches. I have a small collection of them, and I usually pin them to my jackets and vests. But recently I’ve taken to pinning them right to whatever top or sweater I’m wearing. I’m sure it only elevates my old lady status, but I love it anyway.


» Some recent Etsy treasuries featuring shopHollyDolly: one, two, three, four, five.
» I got my hair cut. It’s a little short for my liking :|
» I posted this on instagram, but I though I’d share here, too. I love me some hot dogs, and experimenting with different toppings. Here are some favorites:
» Speaking of food, I made these buffalo chicken meatballs the other day and OMG they were delicious.
» Major outfit crush.
» Items I’m loving at work (pre-fall?! Aaaaah): these pants, the matching jacket, this sweater (and I usually don’t even like camo), and this Lou & Grey dress.
» Are you on Instagram? Follow along! My username is : hollyjollydolly


I’ve mentioned before that I have a staggering 7 rompers (well, now 8. shhhhh) in my closet. What I didn’t include in that is that I also have 4 jumpsuits. That makes 12 adult onsies. TWELVE.
And of course, almost half of them are LOFT/Lou & Grey. Working there is dangerous for me. #loftgirlproblems


jumpsuit: LOFT Lou & Grey
headband: just a scrap of fabric
sunglasses: Warby Parker
tote: Megan Nielsen
heels: Lulu’s
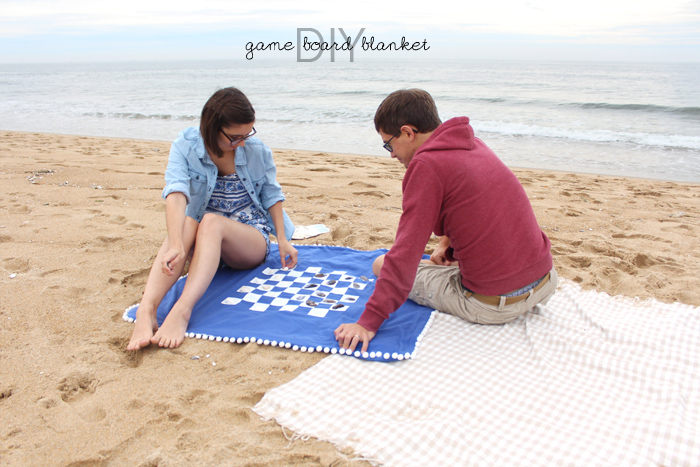
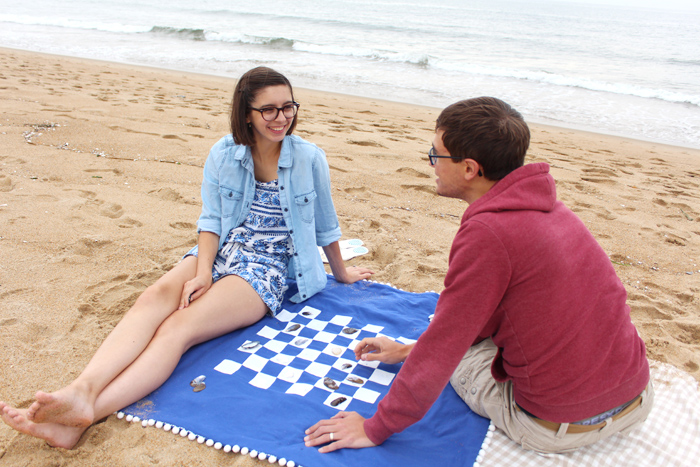
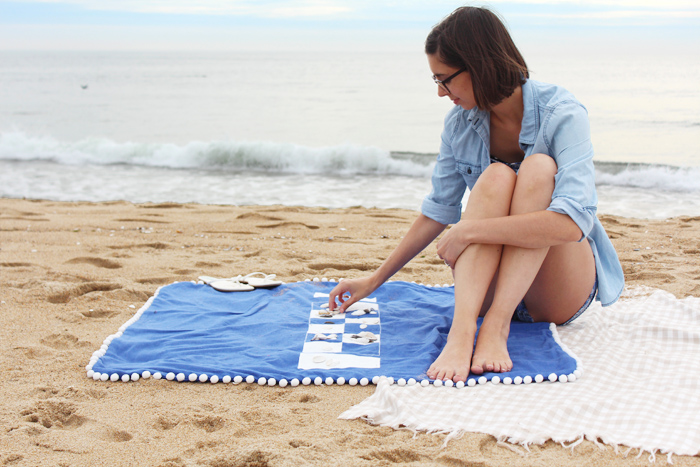
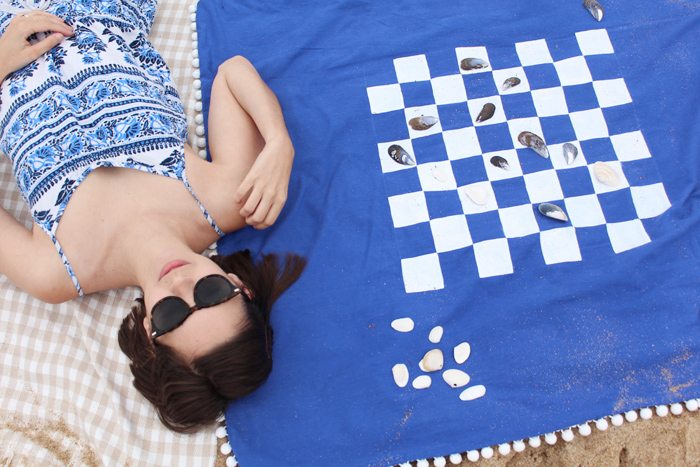
Boo and I love going to the beach. Year round, actually. And heres the thing - as much as I love it, I get antsy sometimes. Boo naps. Like, that’s his favorite thing to do. He hits the sand and he’s out. I need to be doing something, though. I’ve tried bringing a book. But for some reason, I just can’t read on the beach. I get distracted, and still, antsy. I know, I’m weird. Isn’t that like the number one beach activity?!
So I saw this DIY a while back for a portable checkers board made on a placemat, and I thought - why not make it on a bigger scale and put it on a blanket? That way, it’s double duty! Triple duty, actually. Its a game board, its something to sit on, and it’s something to cover up with. And while we’re at it, let’s make it double sided, too.
\
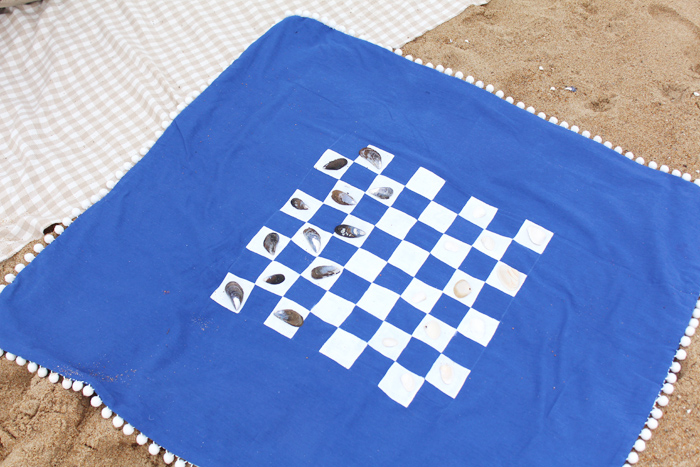
I decided to go with a checkers board on one side, and a mancala board on the other. I’m not very good a checkers, by the way. But mancala? Mancala is my jam.
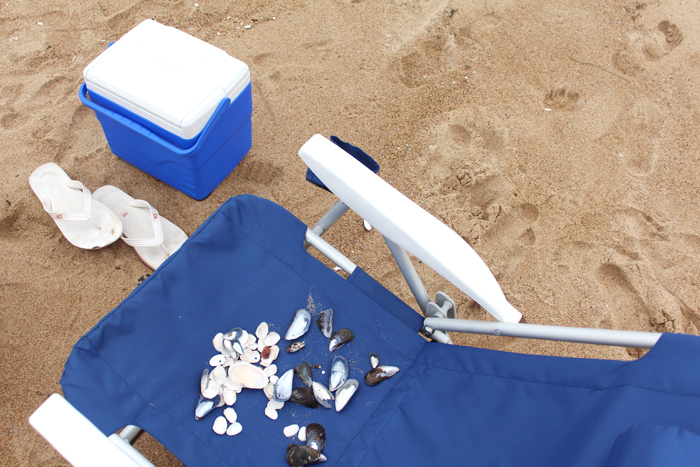
The best part about it? You don’t have to carry around all the little game pieces. Just pick up shells or rocks or anything around you and use those as your game pieces.

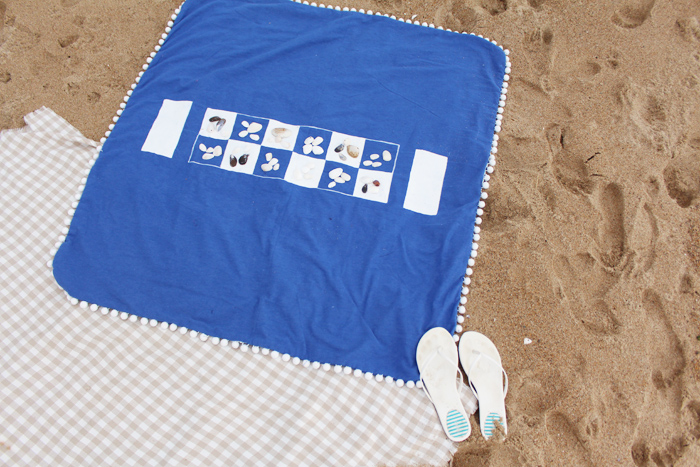
And it doesn’t just have to be for the beach! It would make a perfect picnic blanket. Or just for taking to the park, or your own backyard, and enjoying some fun out in the sun.
So, read on after the jump to see how I made it!
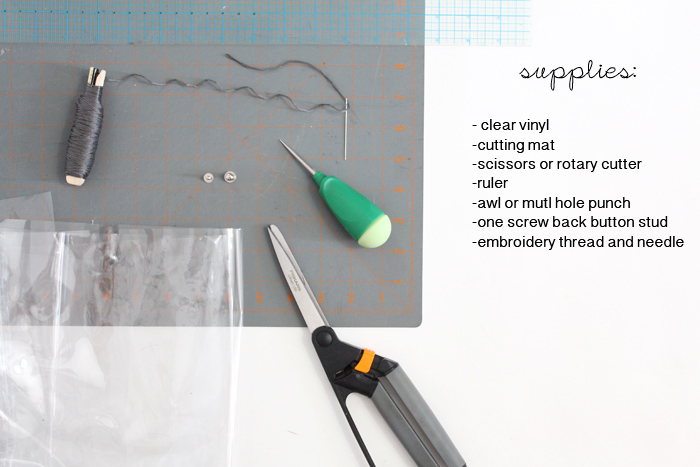
Supplies:
- a couple of yards of fabric (I used a lightweight, soft cotton flannel)
- fabric paint and brush
- scissors
- ruler
- white pencil or chalk
- pom pom trim
- sewing machine / needle and thread
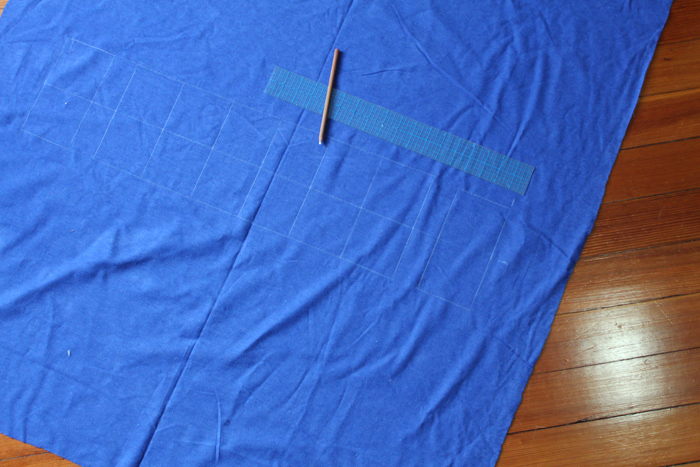
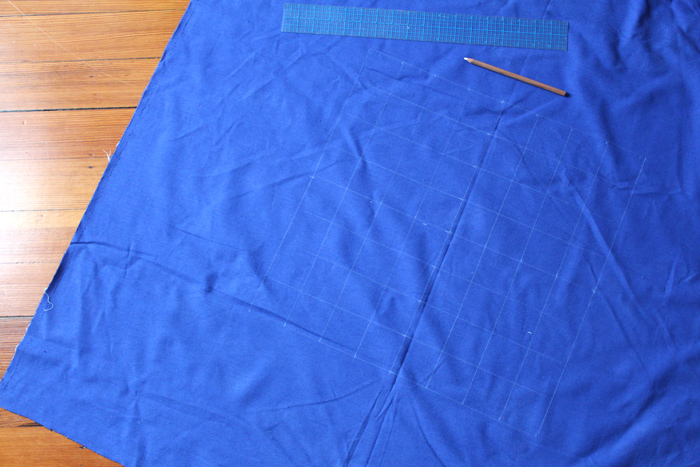
1. Cut two big squares of fabric. As big as your fabric is wide. My flannel was 42” wide, so I ended up with 42” squares.
2. Using tailors chalk or chalk or a white pencil, draw out your game boards. Don’t worry, any extra markings should eventually rub out. Or just wipe them off with a little water.
Your measurements will all depend on how big your fabric is, and how big you want your game boards to be. But here is how mine measured out…
Checkers:
- draw a 18” square in the middle of your fabric. Divide into a 2 1/2” grid. there should be 8 squares on each side.
Mancala:
- draw a 7x27” rectangle in the middle of your blanket. Split right down the middle the long way, and then every 4 1/2” going the short way. That will leave your with two sides of 6 blocks.
- On either end, leave a 2” gap and draw 7x3 1/2” boxes.
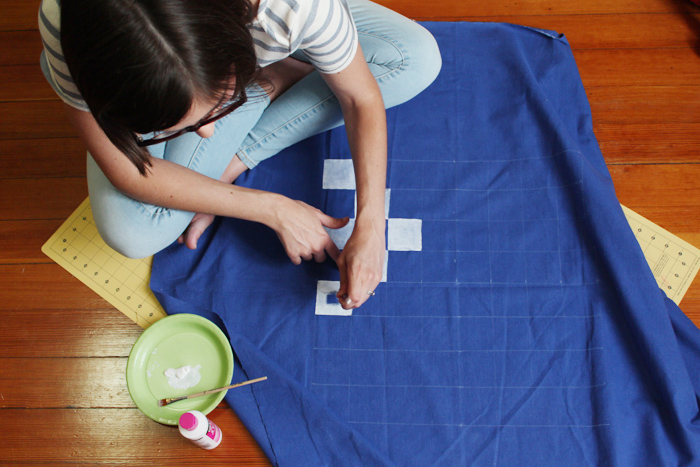
3. Get to painting! Try to keep your lines nice and straight, using a flat edge brush to help. You’ll probably need to do two coats.
Oh! Don’t forget to put something underneath your fabric. It WILL leak through.
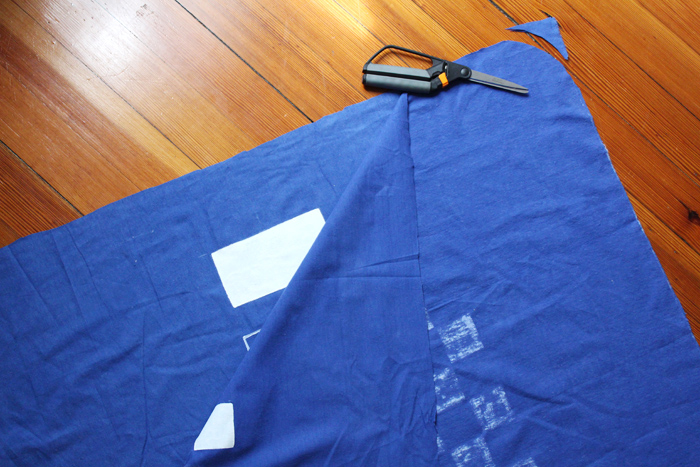
4. Once your paint is dry, place your two fabric pieces with right sides together. Line them up perfectly. I then cut and curved each of my corners just to make it easier to add the trim.
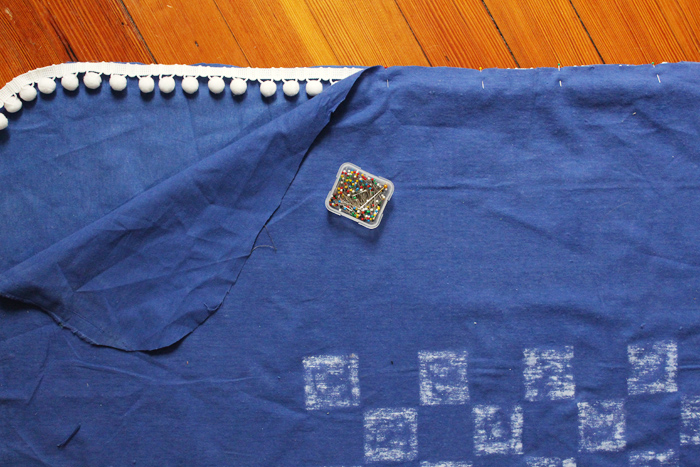
5. Place your trim along the edge, pompoms towards the inside, and sandwiched in-between the two fabric pieces. Pin in place.
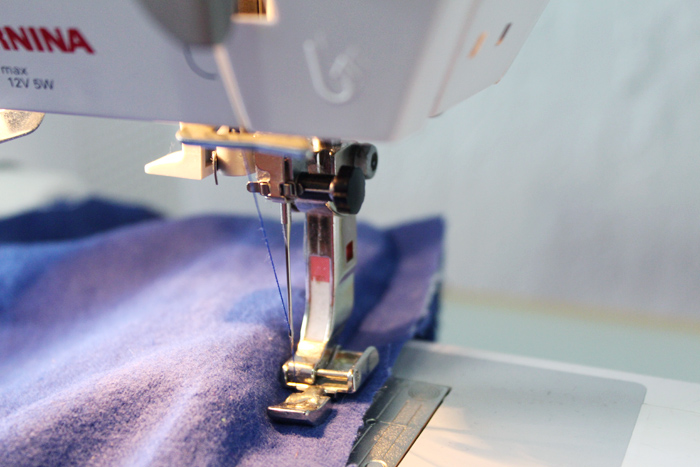
6. Time to sew! It would be best use a presser foot that allows you to get right up close to pom poms, like a zipper foot or something similar. You want to be as close as possible so none of the thick white strip of the trim is popping out in the end.
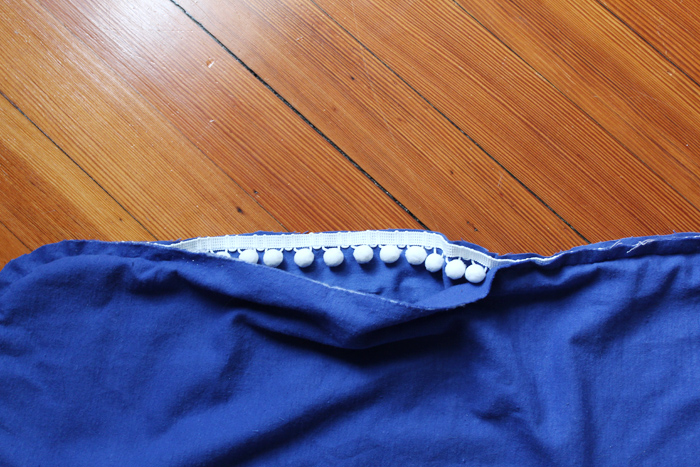
7. Sew almost all the way around, leaving a good sized gap. Make sure the backstitch at each end. If you want to baste down that last bit of trim to one side, you can do that now.
Turn your blanket right side out through the gap that your left. Finish it up by closing the gap with an invisible hand stitch.
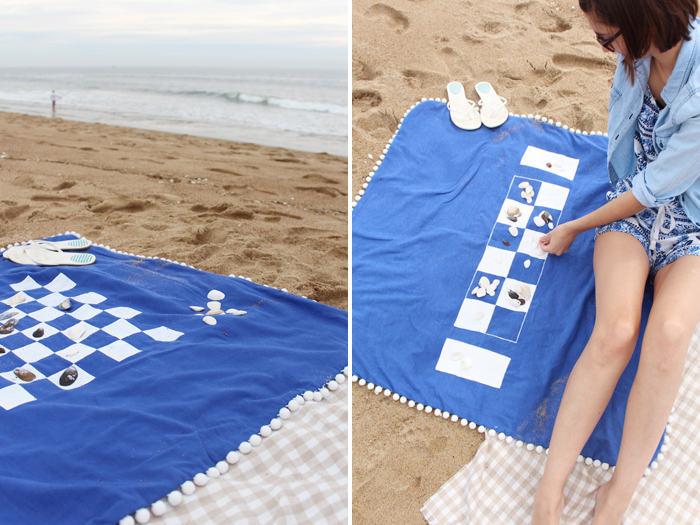
Take your new blanket to the beach, or on a picnic, or to your backyard! Find some rocks or seashells, and have fun :)

// <![CDATA[ !function(d,s,id){var e, p = /^http:/.test(d.location) ? 'http' : 'https';if(!d.getElementById(id)) {e = d.createElement(s);e.id = id;e.src = p + '://' + 'widgets.rewardstyle.com' + '/js/shopthepost.js';d.body.appendChild(e);}if(typeof window.__stp === 'object') if(d.readyState === 'complete') (document, 'script', 'shopthepost-script'); // ]]>

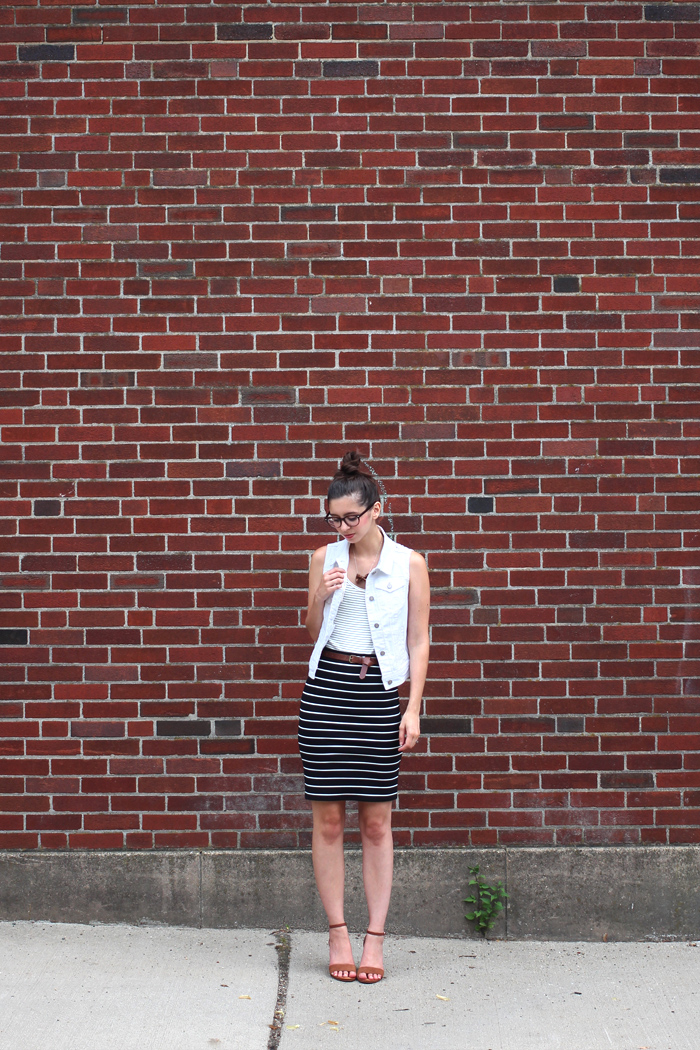
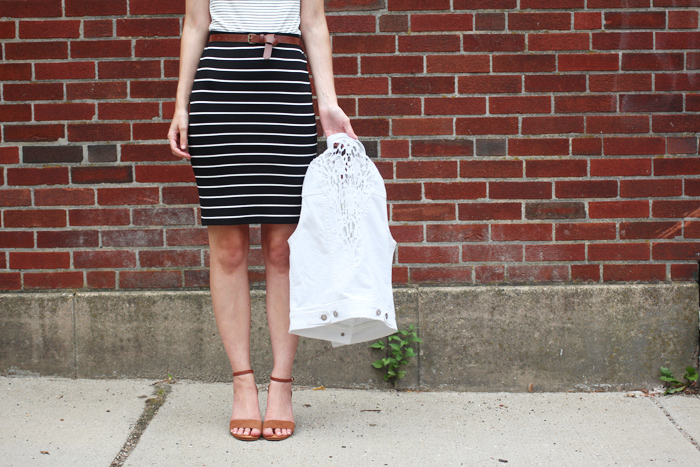
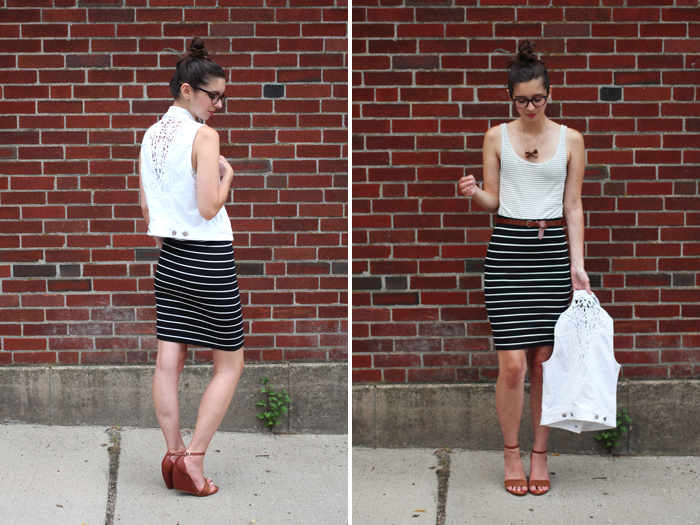
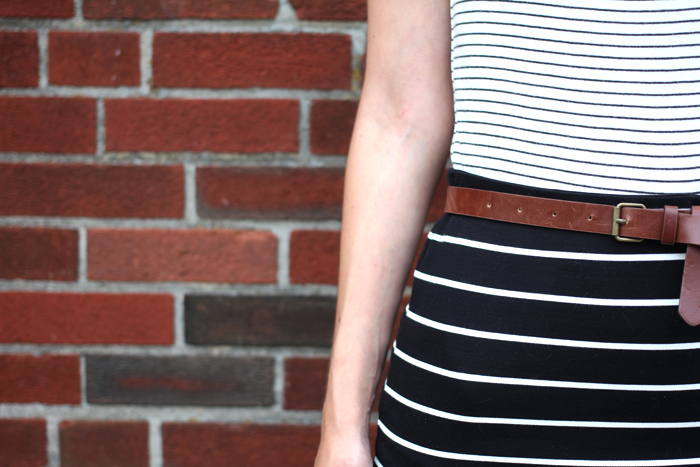
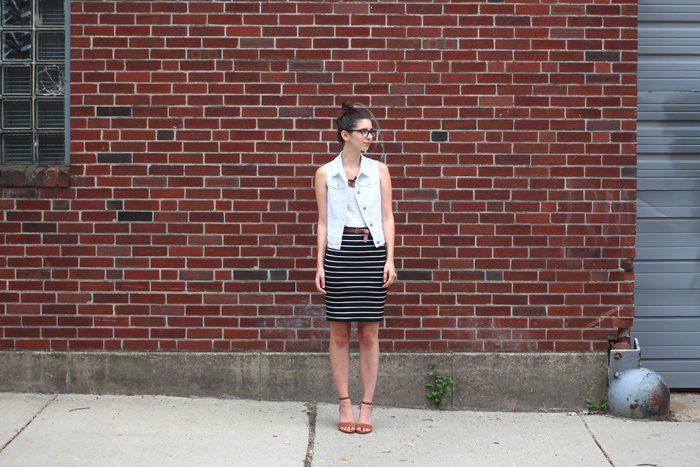
glasses: Warby Parker
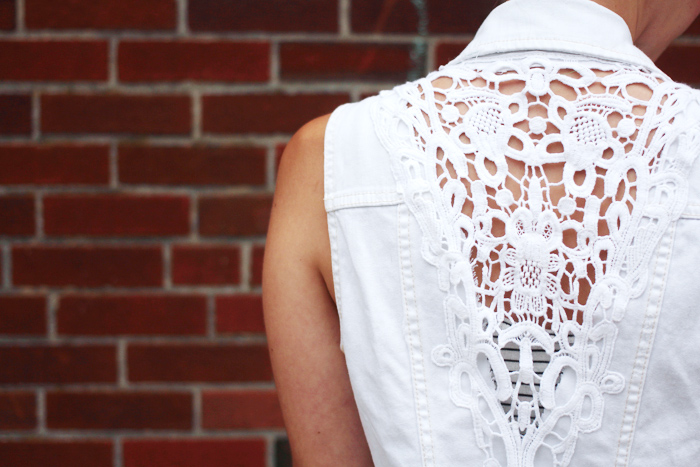
vest: Anthropologie
tank: LOFT
necklace: shopHollyDolly
skirt: LOFT
sandals: Seychelles


/// see this outfit the first time around here ///
cardigan: JCrew
romper: Buffalo Exchange
glasses: Warby Parker
purse: H&M
sandals: Forever21

Geez, guys. I’ve been wanting one of these babies for awhile now. I actually bought some vinyl months ago. But you know, life. Better late than never, though! I’m actually thinking about doing one with white machine stitching too, for an almost completely transparent look. But for this one, I decided to start with a bolder, brighter look.
See how to make it after the jump, and don’t forget to check out how I styled it in yesterday’s post!
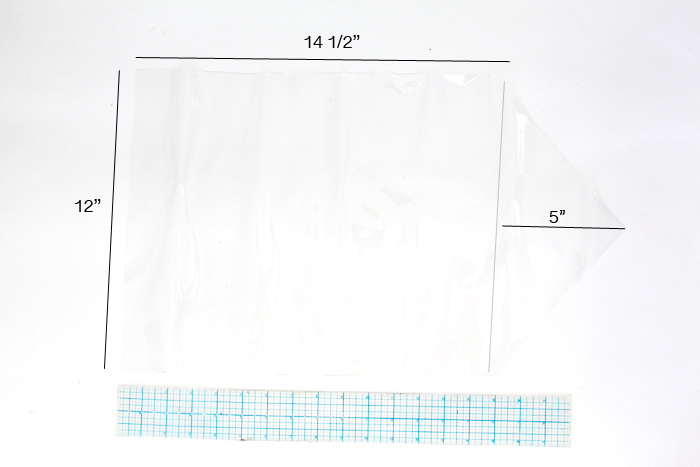
1. Cut your piece of pvc. Start with a 12x14 1/2” rectangle, and then add your triangular top, with the peak being 5” tall.
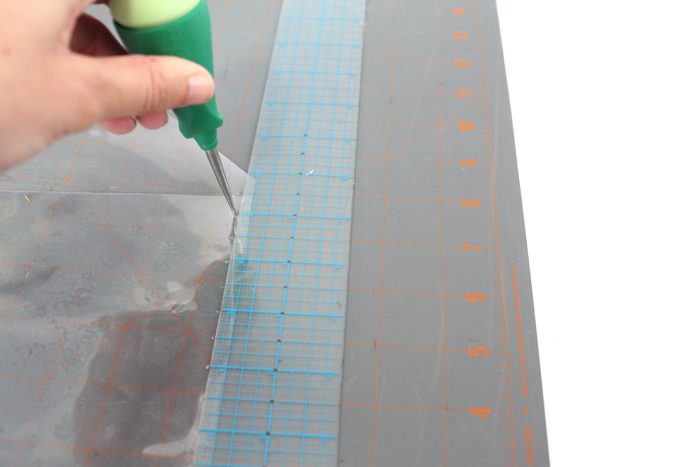
2. Fold the pvc up into the envelope shape, making sure to leave 1/2” at the top. My vinyl stuck to itself when I folded it over, but if it doesn’t, you could use a thin strip of clear-drying glue to hold it together.
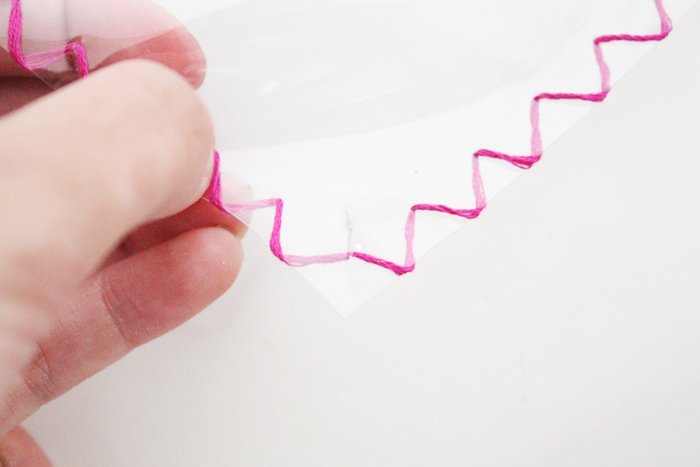
3. Use an awl or something pointy to mark where you want to stitch. I went with 1/4” in from the edge, 1/2” apart.
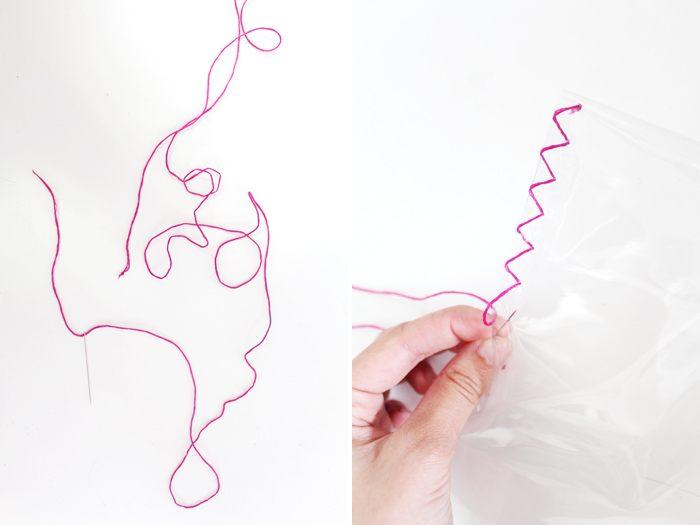
4. Cut a reeeeeeally long piece of embroidery thread and thread your needle. Knot the end. Start your stitching from the inside of the clutch, so that your know is hidden.
If you know some really neat edge stitches, by all means, be creative! After playing around with a few things, I decided to stick with a basic over under technique for a zig zag look.
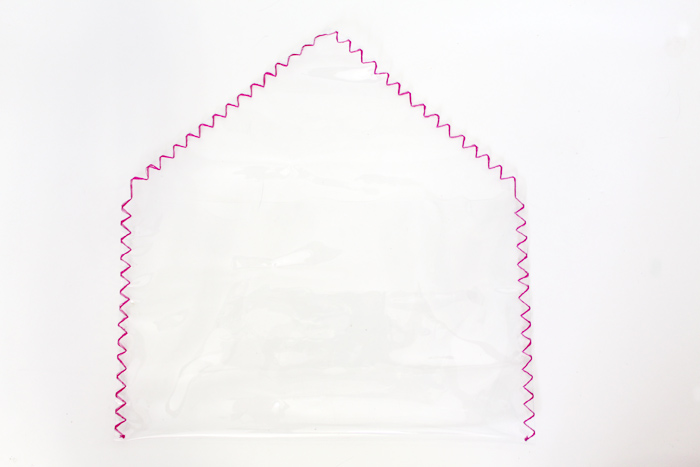
5. Work your way around the entire edge, finishing by bringing it back inside the clutch and knotting it.
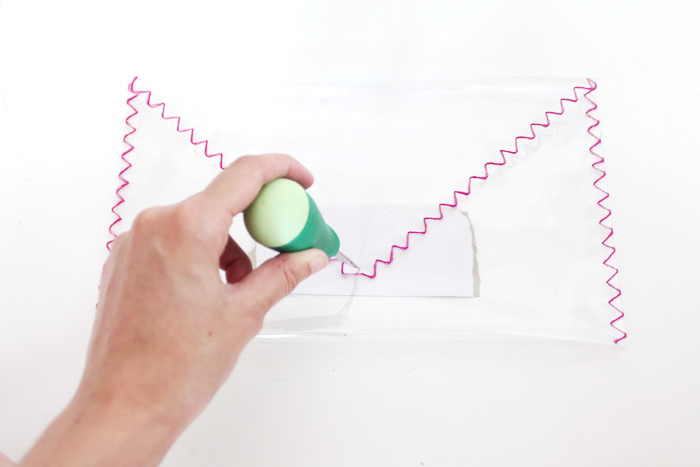
6. It’s time to mark your placement for your button stud. Place a small piece of cardboard, or something like it, inside. You only want to punch a whole in the first two layers - the flap and the front.
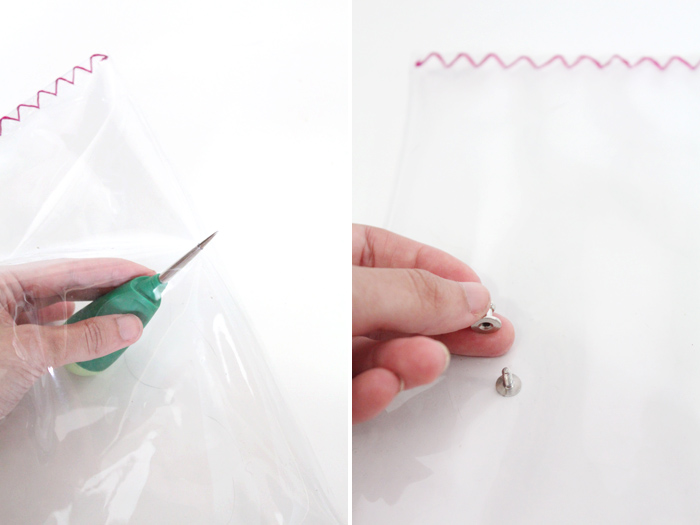
7. On the front, make your hole a little bigger by pushing the awl through farther. Place the screw threw the hole from underneath, and screw the button top on.
8. Make the hole on the flap just a tiny bit bigger by clipping it with a pair of scissors or exact knife.
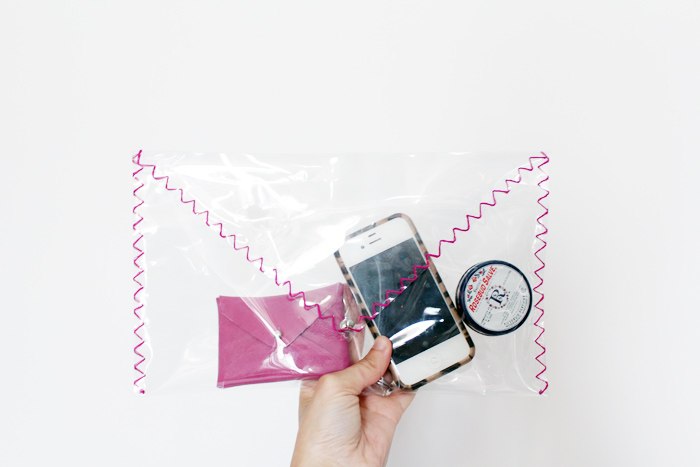
9. Done! Fill your clutch with all your goodies (what you want seen, at least).
P.S - see that little pink pouch? It’s a business card holder, and they’ll be coming to the shop soon!
